Using the App Step
You can configure your App by viewing what was created when you built a new App. You have access to the following:
|
Icon
|
Name
|
Description
|
|

|
Files
|
Click Files to display the file entries for your App.
This lists all the files that are included in your App. It also displays the properties of each file. The information is displayed in either a list or grid format.
You can add or remove files and folders, or create a new folder.
|
|

|
Registry Settings
|
Displays any existing registry keys that were created when the install file was read.
You can add new registry entries and then view and change the attributes of that new entry.
|
|

|
Environment Variables
|
Lists the environment variables for your App. You can add new variables, edit existing variables, or remove variables.
|
|

|
Runtimes
|
When a product (for example the .NET framework required by RADStudio) needs an execution runtime, it is provided to those who master applications. Once you make a selection you are requested to save your changes to the current working file in order to analyze the required runtime changes.
|
|

|
Custom Scripts
|
The AppWave Studio Custom Script Support gives you the ability to attach scripts to key application triggers, such as activation, start, close, and deactivation that can accomplish whatever is necessary.
|
|
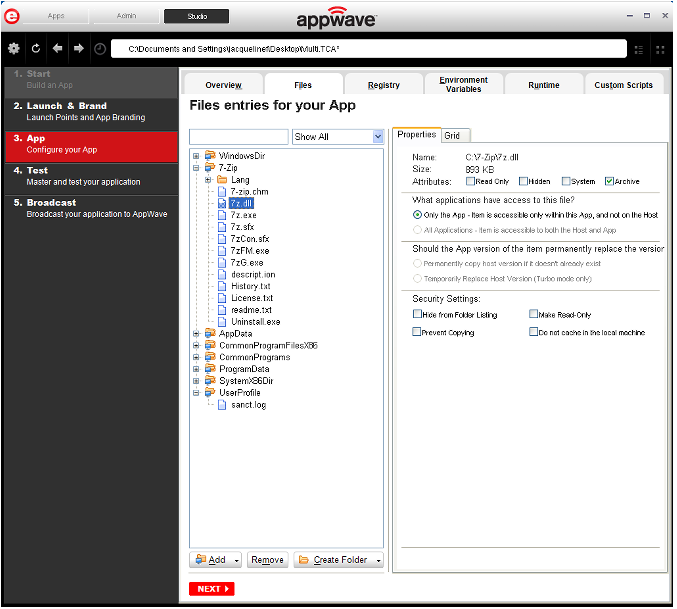
Files
To access this dialog click the App step and the Configure your App dialog appears. Click Files or to open the File entries for your App page. The left-hand panel displays all your files.You can add or remove files. You can also create a new folder under a selected folder.
You have a drop-down box where you can select the Show All (visible only to the App) or Exposed to Host (visible on the host machine).
The Properties and Grid tabs to the right display information on a selected file.
File Actions
You can add or remove files and folders, or create a new folder. There are additional commands available under Add.
|
Button
|
Description
|
|
Add
|
When you click the drop-down arrow you have four options.
File: The Open dialog appears. Browse to the file you want to add and click OK.
Folder: Opens the Browse for Folder dialog. Select the folder you want to add.
Virtual Folder: Opens the Add a Predefined Virtual Folder dialog. Select a folder from the drop-down list and click OK.
Virtual folders are not dependent on location in a hierarchical directory. So a Streaming core allows you to basically mount the file system so that when you want to add to your App, and remaster it, you have the virtual file system present on the hard drive so you can do whatever you want with it.
Add Root Folder: Opens the Browse for Folder dialog. Select the folder you want to add. The new folder is added to the top level or root of the tree.
|
|
Remove
|
Select a file in the tree and click Remove. A Confirm dialog appears asking you to click OK to continue.
|
|
Create Folder
|
Create Folder Select a folder in the tree and click Create Folder. Enter a name for the new folder and it is placed as a subfolder in the tree.
Create Root Folder: Enter the name of the new folder to add. The new folder is added to the top level or root of the tree.
|
|
You also have commands available when you right click on a folder or file in the tree.
|
Command
|
Description
|
|
Add File
|
The Open dialog appears. Browse to the file you want to add and click OK.
|
|
Add Folder
|
Opens Browse for Folder. Select the folder you want to add.
|
|
Add Virtual Folder
|
Opens Add a Predefined Virtual Folder. Select a folder from the drop-down list and click OK.
|
|
Add Root Folder
|
Opens Browse for Folder. Select the folder you want to add. The new folder is added to the top level or root of the tree.
|
|
Create Folder
|
Select a folder in the tree and click Create Folder. Enter a name for the new folder and then it is placed as a subfolder in the tree.
|
|
Create Root Folder
|
Enter the name of the new folder to add. The new folder is added to the top level or toot of the tree.
|
|
Remove
|
Right-click a file in the tree and click Remove. A Confirm dialog appears asking you to click OK to continue.
|
|
Apply Visibility to Children
|
Takes the parent folder visibility settings and applies them to all the children.
|
|
File Filters
You have a drop-down box where you can select Show All (visible only to the App) or Expose to Host (visible on the host machine).
Properties/Grid Tabs
Information on a selected file/folder is displayed in two different formats: properties and grid.
The properties tab for a file displays the following information:
|
Option
|
Description
|
|
Name
|
If you selected a file, the file name and path of the selected file. If a folder is selected, the number of files and/or folders are displayed.
|
|
Size
|
If an application, the size of the file is displayed.
|
|
Attributes
|
The attributes of a selected file are displayed: Read Only; Hidden, System, Archive (default setting)
|
|
Only the App
|
The selected file or folder is only accessible within the App and is not visible to the host. Files or folders with attribute changes are kept private in a cache managed by the Browser.
|
|
All Applications
|
The selected file or folder is available to the host and can be accessed by external processes and users. Unless it is hidden from the folder listings, it is displayed by all applications that list the contents of the host’s file system.
|
|
Permanently copy host version if it doesn’t already exist
|
Before activation, the App checks to see if this file already exists on the host. If it does, it uses the existing file. If the file does not exist, it is permanently placed on the machine.
|
|
Temporarily Replace Host Version (Turbo mode only)
|
If this file already exists on the host, the App version of the file replaces the existing file as long as the App is active in the Browser. If you remove the App or clear the local Browser cache, the previous version is restored.
|
|
Hide From Folder Listings
|
This file is not displayed in the list of folders. Select this option if you want to hide this particular file in a file listing so it is not visible to other users.
|
|
Prevent Copying
|
Select this option if you do not want other users to copy the file from a temporary location where it was streamed. However these files are able to be read from outside.
|
|
Make Read Only
|
Select this option if you do not want other users to alter the files.
|
|
Do not cache in the local machine
|
This file is not permitted to be cached to the local system. This security setting ensures that the file is not located anywhere on the system.
|
|
The properties tab for a folder displays the following information:
|
Option
|
Description
|
|
Name
|
The file name and path of the selected file.
|
|
Contains
|
The number of files and/or folders is displayed.
|
|
Only the App
|
The selected file or folder is only accessible within the App and is not visible to the host. Files or folders with attribute changes are kept private in a cache managed by the Browser.
|
|
All Applications
|
The selected file or folder is available to the host and app, and can be accessed by external processes and users. Unless it is hidden from the folder listings, it is displayed by any and all applications that list the contents of the host machine’s file system.
|
|
Permanently copy host version if it doesn’t already exist
|
Before activation, the App checks to see if this file already exists on the host. If it does, it uses the existing file. If the file does not exist, it is permanently placed on the machine.
|
|
Temporarily Replace Host Version (Turbo mode only)
|
If this file already exists on the host , the App version of the file replaces the existing file as long as the App is active in the Browser. If you remove the App or clear the local cache, the previous version is restored.
|
|
The grid format displays the following for both files and folders:
|
Option
|
Description
|
|
File/Folder Name
|
The name of the file or folder selected.
|
|
Size
|
If a file, the size of the file. If a folder, then the number of files/folders contained in the folder.
|
|
Application Access
|
The selected file or folder is available to the host machine and can be accessed by external processes and users. Unless it is hidden from the folder listings, it is displayed by any and all applications that list the contents of the host machine’s file system.
|
|
App Access
|
The selected file or folder is only accessible within the App and is not visible to the host machine. Files or folders with attribute changes are kept private in a cache managed by the Browser.
|
|
Path
|
Path where the file/folder is stored.
|
|
To access the attribute information in the grid format, select a file in the grid and click Edit. The Edit selection dialog lists all the attributes for the selected file.
You can delete a file by selecting the file and clicking Remove. A confirm dialog appears.
Registry Settings
When you click Registry tab or  on the Overview tab, the Registry entries for your App dialog appears. You can:
● Add a registry key from the system registry
● Remove a registry key you have added
● Create a registry key or value
When modifying registry keys it is important to know the system variables. You need to know what variables can be used that will be replaced with the correct path when an App is loaded on a machine. For more information, see: Predefined Virtual Folders.
On the left is a tree of registry setting groups. The base folders are defined in the .tca model:
HKEY_CLASSES_ROOT
HKEY_CURRENT_USER
HKEY_LOCAL_MACHINE
HKEY_USERS
You have a drop-down box where you can select the Show All (visible only to the App) or Exposed to Host (visible on the host machine).
Caution: It is best practice to review the registry settings before broadcasting your application. Make sure there are no files or registry keys not directly relating to the application. Remove any that have been included in error.
You need to also verify that registry keys refer to a generic path. For example a path should be%USERPROFILES%\My Documents not C:\Documents and Settings\<username>\My Documents.
View and Change Attributes
In the right-hand panel you can view and/or change the attributes of a selected registry entry.
|
Command
|
Description
|
|
What applications have
access to this registry
|
|
Only the App
|
These are items accessible only within the App, and not on the Host. The selected file or folder is only accessible within the App and is not visible to the host machine. Files or folders with attribute changes are kept private in a cache managed by the Browser.
|
|
All Applications
|
The selected file or folder is available to the host and app, and can be accessed by external processes and users. Unless it is hidden from the folder listings, it is displayed by any and all applications that list the contents of the host machine’s file system.
Note: See caution below when mastering an App on the Windows 7 OS.
|
|
Should the App version of the item permanently replace the version on the Host?
|
|
Permanently copy host version if it doesn’t already exist
|
Before activation, the App checks to see if this registry already exists on the host machine. If it does, it uses the existing file.If the file does not exist, it is permanently placed on the machine.
Note: See caution below when mastering an App on the Windows 7 OS.
|
|
Temporarily Replace Host Version (Turbo mode only)
|
If this registry already exists on the host machine, the App version of the file replaces the existing file as long as the App is active in the Browser. If you remove the App or clear the local Browser cache, the previous version is restored.
|
|
Caution: When mastering an App on the Windows 7 OS, create registry keys under HKEY_CLASSES_ROOT or in one of the subdirectories of HKEY_CURRENT_USER, HKEY_LOCAL_MACHINE, and HKEY_USERS.
If the properties for the key you created are set to "All Applications," "Permanently Copy Host Version" and “Temporarily Replace Host Version” an error message (APM_E_APP_CONFIG_INSTALL_REGISTRY) will be generated.
To fix this registry problem, you must delete the key you just created.
Environment Variables
When you click Environment Variables or  , the Environment variables for your App dialog appears. The following table discusses the three options:
|
Field
|
Description
|
|
Add
|
Click Add and the New Environment Variable dialog appears. Enter the variable name and value name here.
|
|
Edit
|
Once an environment variable is added, you can then edit it..
|
|
Remove
|
Select a variable and click Remove. A confirm dialog appears.
|
|
Runtimes
When you click Runtime or  on the Overview tab, the Runtimes required by your App dialog appears. You can pick and choose what runtimes you want to include in your App.
Note: The version attribute must match the installation folder name for the specified version.
The table below lists sample runtimes.
|
Display Name
|
Description
|
|
.Net .35 runtime plug-in
|
Plug-in to add a cross OS set of registry keys and files that make up the Microsoft .Net 3.5.
|
|
Microsoft J# runtime plug-in
|
Plug-in to add a cross OS set of registry keys and files that make up the Microsoft J# runtime.
|
|
Microsoft Visual C++ 2005 SP1 redistributable runtime plug-in
|
Plug-in to add a cross OS set of registry keys and files that make up the Microsoft Visual C++ 2005 SP1
|
|
Microsoft Visual C++ 2008 SP1 redistributable runtime plug-in
|
Plug-in to add a cross OS set of registry keys and files that make up the Microsoft Visual 2008 SP1
|
|
Once you select one of the default settings, you are prompted to save your changes to the current working file in order to analyze the required runtime changes.
You can find a listing of all currently available plug-ins through the AppWave Admin Console. From the Console Dashboard, click Manage mastering plug-ins.
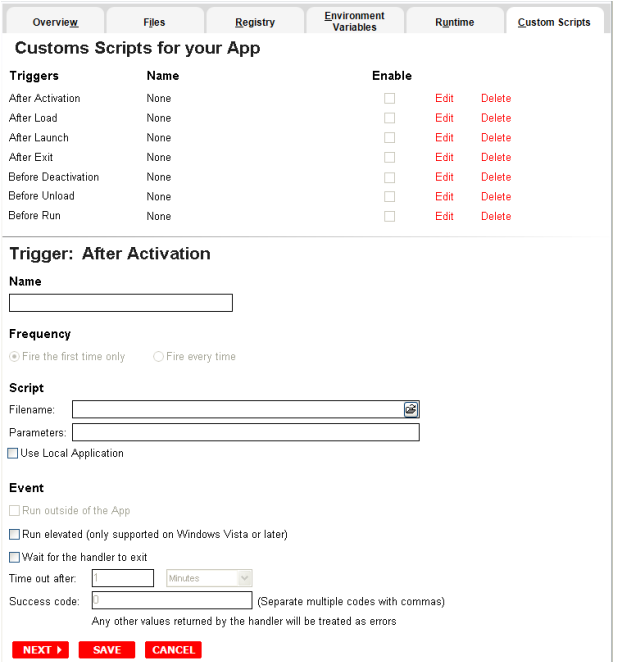
Custom Scripts
When you click Custom Scripts or  on the Overview tab, the Custom Scripts for your App dialog opens. You can set and edit triggers to create a custom script for the App you are mastering.
These scripts are typically small executable files and batch files. There is a 10 MB size limit for each script. Exe, bat, and cmd files are supported
When you convert a locally installed application into a streamable application, the "native" states of the installed application are captured and recorded in the appset file. When you activate an application, those states are re-created on your system.
Sometimes in order for the application to run properly, it may be necessary to adjust those native states or the runtime environment before, during, or after activation because certain actions cannot be captured in an appset.
An AppEvent is a process or action that uses a trigger to run an executable program or script. In turn, the script or program contains instructions to perform specified runtime action(s) that are required by the application being packaged, such as launching another application. Examples of actions that may need to be performed at runtime are:
● Establish a connection to a shared network location before the application starts
● Run a file backup/archive process for user created documents after the application has exited.
● Configuring plug-ins for office suites and browser applications
● Configuring virtual printers
● Configuring game parameters for a video game
● Starting a background program
You can enable, edit or delete a trigger.
1. Click a trigger or application event on the list, click Edit, and the Enable box is activated. Once you have made all your edits and saved your trigger, you can then select the Enable option.
Note: When you select a trigger, notice that the panel below the trigger table now displays the name of the trigger. For example if you selected “After Activation”, the next panel is now labeled “Trigger: After Activation”.
The following items can be edited:
|
Item
|
Description
|
|
Name
|
The name of the script.
|
|
Frequency
|
|
Fire the first time only
|
The script runs only the first time the trigger is activated.
|
|
Fire every time
|
The script runs every time the trigger is activated.
|
|
Script
|
|
Filename
|
Click the folder icon to locate the script. Exe, bat, and cmd scripts are supported.
|
|
Parameters
|
The parameters to use with the script.
|
|
Use Local Application
|
Select if the script is located on the local PC or on the company network.
|
|
Event
|
|
Run outside of the App
|
|
|
Run elevated (only
supported on Windows
Vista or later)
|
This setting causes Windows to elevate the program to administrator level before running it. Some programs require administrative privileges to run properly.
|
|
Wait for the handler to exit
|
Waits for the code that has been activated by the trigger to complete before exiting.
|
|
Time out after
|
If the code hasn’t completed before the time out after period expires, the trigger exits. Enter "0" for no time out.
|
|
Success codes
|
Values that if returned by the trigger code indicate that the code ran successfully. Any other values are treated as errors.
|
|