Click Test to master and test your App locally. This option allows you to master an App using the template .tca file that you just created.
This also where you can record the launch of the application for faster start-up time. This prefetch action performs the process of streaming application blocks in anticipation that those blocks are needed by an application. Only some key blocks of application data from AppWave are necessary for the application to launch and perform basic functions.
A .tca file (also known as the Studio file) is a set of information that defines the resources, launch points, and registry settings required to run a product. It also contains information about the product such as the version, name, and editions. The .tca file needs to contain all the files that are associated with it. The .tca file has file system information that actually lists files for the program it needs to master. The files have to be physically present at the directory information that is saved in the .tca data.
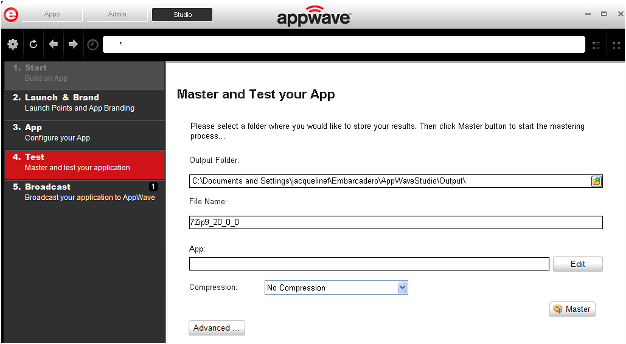
1. The Output Folder is automatically populated with the path, i.e., C:\Documents and Settings\<user>\Embarcadero\AppWaveStudio\Output\.
2. The File Name is also automatically populated with the information from the Launch & Brand page.
3. In the App field if an App file exists for the App (.stp), click Edit. Select the App file (.stp) to associate with the .tca file for this App.
Note: This .stp file is typically located in the same output directory (c:\Documents and Settings\<user>\Embarcadero\AppWaveStudio\Output\<app name.stp>).
4. Click the drop-down arrow in the Compression field and select the type you want to use. “Best Compression” is the recommended setting for Compression.
5. If you want to select the type of encryption to use in the App, click Advanced.
6. After your have verified your selections, click Master. If you haven’t saved your file, you will be asked to save your changes to the current working file.
7. The Master dialog appears with a progress bar showing the mastering steps. Click Details to view the mastering details.
8. Once the mastering is completed, an option to Record the launch of the application for faster start-up time appears in the Master dialog.
9. Click Launch to open the App and the Recording dialog opens once again.
10. Accept the End User License Agreement that appears and then once the application is open, click Finished in the Recording dialog.
11. The Master dialog reopens. Notice that a prefetch file has been created.
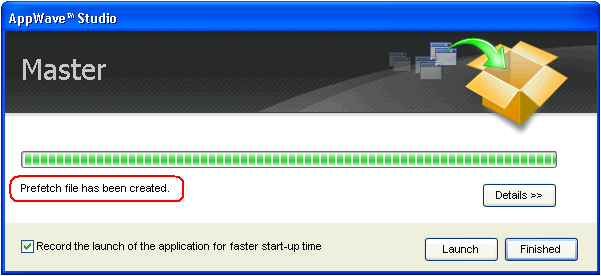
12. Click Finished in the Master dialog and then click Next to advance to the Broadcast step.
For more information on this step, see: Using the Test Task.